Here is a short video explaining the process, scroll down for detailed ingredients and step by step recipe method. Thanks for coming and do not forget to follow Food Paradise on Pinterest.
Ingredients With Exact Amounts
The ingredient list below is built around the most reliable Matilda-style cake formula used by home bakers: flour, cocoa powder, sugar, eggs, oil, buttermilk, and hot coffee for the cake, plus chocolate, cream, and butter for a rich frosting. That combination is what gives this cake its moist crumb and strong chocolate taste.
For the Chocolate Cake
- 3/4 cup unsweetened cocoa powder
- 1 1/2 teaspoons baking powder
- 1 1/2 teaspoons baking soda
- 2 large eggs, at room temperature
- 1 cup buttermilk, at room temperature
- 2 teaspoons vanilla extract
For the Chocolate Frosting
- 12 ounces dark or semi-sweet chocolate, finely chopped
- 2 tablespoons unsalted butter
- 1 teaspoon vanilla extract
- 2 tablespoons cocoa powder, optional, for a deeper chocolate taste
- 1 to 2 tablespoons powdered sugar, optional, if you want it slightly sweeter
For Preparing the Pans
- Butter or oil for greasing
- 2 tablespoons flour or 2 circles of parchment paper
Step by Step Recipe Method
This is the heart of the recipe, so take your time and follow each step in order. Matilda-style chocolate cake is not difficult, but the small details matter. Good mixing, proper pan prep, and full cooling before frosting will give you the best result. Many well-rated versions also note that the batter will be thin once the hot coffee goes in, and that is completely normal.
Step 1: Prepare the Oven and Cake Pans
Start by preheating your oven to 350°F, which is 175°C. Grease two 8-inch round cake pans with butter or a little oil. Then dust them lightly with flour or line the bottoms with parchment paper.Do not skip this part. A rich chocolate cake can stick if the pans are not prepared well. When the pans are ready, set them aside so you can work smoothly once the batter is mixed.
Step 2: Mix the Dry Ingredients
Take a large mixing bowl and add the flour, sugar, cocoa powder, baking powder, baking soda, and salt. Whisk everything together very well for about 30 to 45 seconds.This step does more than simply combine the ingredients. It spreads the cocoa and raising agents evenly through the flour, which helps the cake bake with an even texture and flavor. If your cocoa has lumps, break them up now so the batter stays smooth later.
Step 3: Mix the Wet Ingredients
In a second bowl, add the eggs, buttermilk, vegetable oil, and vanilla extract. Whisk until the mixture looks smooth and fully combined.Room temperature ingredients help the batter come together more easily, which is one reason many chocolate cake recipes recommend them. Buttermilk is especially useful here because it helps create a softer, more tender crumb.
Step 4: Combine Wet and Dry Ingredients
Pour the wet mixture into the bowl of dry ingredients. Stir with a whisk or spatula until you no longer see dry flour. The batter will look thick at this stage.Do not overmix. Mix only until everything is combined. Too much mixing can make the cake heavy instead of soft.
Step 5: Add the Hot Coffee
Now slowly pour in the hot coffee while whisking gently. Keep mixing until the batter is smooth. It will become much thinner than a usual cake batter.Do not worry. This is expected. Hot coffee is a common trick in chocolate cakes because it helps the cocoa bloom, which means it brings out a fuller and deeper chocolate flavor. It should not make the cake taste like coffee.
Step 6: Fill the Pans and Bake
Divide the batter evenly between the two prepared pans. Tap each pan lightly on the counter once or twice to release any large air bubbles.Place the pans in the preheated oven and bake for 30 to 35 minutes. Start checking at 30 minutes. Insert a toothpick into the center. If it comes out with a few moist crumbs, the cakes are ready. If you see wet batter, bake for a few minutes more.Try not to open the oven too early. That can cause the cake to sink in the middle.
Step 7: Cool the Cakes Properly
Remove the pans from the oven and let the cakes rest in the pans for 10 to 15 minutes. Then run a knife gently around the edges and turn the cakes out onto a wire rack.Leave them to cool completely. This part matters a lot. If the cakes are even a little warm, the frosting can melt and slide. Many Matilda-style recipe guides mention that frosting a warm cake is one of the easiest ways to ruin the final finish.
Step 8: Make the Chocolate Frosting
Place the chopped chocolate in a heat-safe bowl. In a small saucepan, warm the heavy cream until it is hot but not boiling. Pour the hot cream over the chocolate and let it sit for 2 minutes.Add the butter and vanilla extract. If you want a darker, stronger frosting, add the cocoa powder now. Stir slowly until the mixture becomes smooth, glossy, and fully melted.If you prefer a slightly sweeter frosting, stir in 1 to 2 tablespoons powdered sugar. Then leave the frosting at room temperature for 20 to 30 minutes, or until it thickens enough to spread.
Step 9: Level the Cakes if Needed
If the cake layers have a small dome on top, trim them gently with a serrated knife. This will help the cake stack neatly and prevent sliding.You do not need to make them perfect. Just remove enough to create a flat surface. Save the scraps for snacking.
Step 10: Fill and Frost the Cake
Place one cake layer on your serving plate or cake stand. Add a generous amount of frosting on top and spread it evenly from the center to the edges.Place the second cake layer on top. Press down very gently so it sits flat. Spread frosting over the top and then around the sides. Use the back of a spoon or an offset spatula to create a smooth finish or a soft rustic look.Matilda-style cakes are known for looking generous and rich, so do not be shy with the frosting. A thick layer is part of the charm.
Step 11: Let the Cake Set Before Slicing
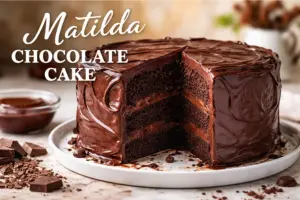
Once frosted, let the cake sit for 20 to 30 minutes before slicing. This gives the frosting time to settle and makes cleaner slices.When you cut into it, you should see soft dark layers with a moist crumb and a rich chocolate filling between them.
Variations in the Recipe
This cake is already beautiful as it is, but you can still change it to fit your taste. Matilda-style chocolate cakes often vary in frosting style, number of layers, and how intense the chocolate flavor is. Some versions use sour cream, some use buttermilk, and some add extra melted chocolate for even more richness.
Three-Layer Version
Divide the batter into three 8-inch pans instead of two. Bake for a slightly shorter time, usually 22 to 28 minutes. This gives the cake a taller and more dramatic look.Add 2 ounces of melted dark chocolate to the batter after mixing in the wet ingredients. This gives the cake an even deeper flavor and a more fudgy texture.
Cupcake Version
Pour the batter into lined muffin cups, filling each about two-thirds full. Bake at 350°F for 18 to 22 minutes. Frost once fully cooled.
No Coffee Version
Use hot water in place of hot coffee. The cake will still taste good, though many bakers prefer coffee because it makes the chocolate taste fuller and richer.
Creamier Frosting Version
If you want a softer and fluffier finish, fold 1/2 cup whipped cream into the cooled frosting once it has thickened. This will lighten the texture without losing the chocolate flavor.
Mistakes to Avoid
A cake like this can turn out wonderfully at home, but a few common mistakes can affect the texture, shape, and flavor. The good news is that they are easy to avoid once you know what to watch for. Home baking guides for this cake often point to overmixing, overbaking, and frosting too early as the biggest problems.
Overmixing the Batter
Once the flour is wet, mix gently and stop as soon as the batter is smooth. Overmixing can make the cake dense.
Skipping the Hot Coffee
You can replace it with hot water, but skipping this step entirely means you lose both moisture and some of the deep chocolate taste that makes this cake special.
Overbaking the Cake
Even a few extra minutes can dry out a chocolate cake. Start checking early and remove the cakes when a toothpick comes out with moist crumbs, not dry crumbs.
Frosting the Cake While It Is Warm
This causes the frosting to melt, slide, and lose shape. Let the layers cool completely first.
Using Low-Quality Chocolate
Since the frosting is a major part of the cake, the chocolate matters. Choose a chocolate that melts smoothly and tastes good on its own.
Helpful Tips for the Best Homemade Result
A recipe like this becomes even better when you use a few smart habits in the kitchen. These simple tips make a real difference, especially if you are baking this cake for guests or a special occasion.
Measure Carefully
Use level cups and spoons. Too much flour can make the cake dry, while too much cocoa can make it slightly heavy.
Use Room Temperature Ingredients
Eggs and buttermilk mix more evenly when they are not cold. This helps create a smoother batter.
Chop the Chocolate Finely
Small pieces melt faster and give you a smoother frosting.
Let the Frosting Thicken Naturally
If the frosting feels too loose right after mixing, leave it at room temperature instead of rushing it into the fridge. It usually thickens nicely on its own.
Slice With a Warm Knife
Run your knife under warm water, dry it, and then slice. This helps you get neat pieces through the rich frosting.
FAQs
People often have a few questions before baking a cake like this for the first time. These are the ones that matter most in a home kitchen.
Can I make Matilda chocolate cake without buttermilk?
Yes. If you do not have buttermilk, you can make a quick version by adding 1 tablespoon of vinegar or lemon juice to 1 cup of milk and letting it sit for 5 to 10 minutes. Several popular versions of this cake use that same idea.
Will the cake taste like coffee?
No. The coffee does not make the cake taste like a mocha dessert. Its job is to deepen the chocolate flavor. This is one of the most repeated tips across Matilda-style chocolate cake recipes.
Can I make this cake a day ahead?
Yes. You can bake the layers a day ahead, wrap them well once cool, and frost them the next day. That often makes the process easier.
How should I store the cake?
Store it in an airtight container at room temperature for up to 2 days if your kitchen is cool. For longer storage, keep it in the fridge for up to 5 days and bring slices back to room temperature before serving.
Can I freeze it?
Yes. You can freeze the unfrosted cake layers tightly wrapped for up to 2 months. Thaw them in the fridge overnight, then bring to room temperature before frosting.
Conclusion
Matilda chocolate cake is one of those recipes that feels dramatic and comforting at the same time. It looks rich, tastes deeply chocolatey, and still uses simple ingredients that home bakers know well. With the hot coffee, buttermilk, and thick chocolate frosting, you get the kind of cake that feels special from the very first slice. The movie-inspired versions shared by home bakers all point to the same goal: a moist, bold, chocolate-heavy cake that is worth making from scratch.