Here is a short video explaining the process in short. Please find details on ingredients and step by step recipe below.
Ingredients
Before you start baking, gather everything you need and set it out on your counter. Having your ingredients ready before you begin makes the whole process smoother and helps you avoid missing anything mid-recipe. All measurements below are for one standard 9×5-inch loaf pan, which gives you about 10 slices.
Wet Ingredients
- 3 to 4 medium overripe bananas (about 1½ cups or 380g when mashed)
- ½ cup (115g) unsalted butter, melted and slightly cooled
- ¾ cup (150g) granulated white sugar — or use half white, half light brown sugar for extra depth and moisture
- 2 large eggs, at room temperature
- 1 teaspoon pure vanilla extract
- ¼ cup (60g) plain Greek yogurt — full fat works best
Dry Ingredients
- 1¾ cups (220g) all-purpose flour, spooned and levelled
- 1 teaspoon baking soda
- ½ teaspoon fine salt
- ½ teaspoon ground cinnamon (optional but highly recommended)
Mix-Ins and Topping
- 1 cup (175g) semi-sweet chocolate chips, divided — reserve about 2 tablespoons for the top of the loaf
Step-by-Step Recipe Method
This is the heart of the recipe. Follow each step carefully and you will end up with a loaf that looks beautiful and tastes even better. Do not rush through any stage — each one plays a role in giving you the right texture and flavour.
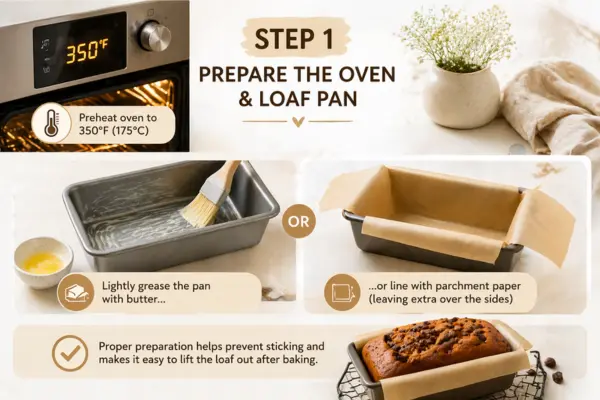
Step 1: Prepare the Oven and Loaf Pan
Start by preheating your oven to 325°F (165°C). This lower temperature is intentional. It allows the centre of the loaf to bake through fully without the top burning or the edges drying out. While the oven heats up, prepare your 9×5-inch loaf pan by greasing it lightly with butter or non-stick spray. Then cut a piece of parchment paper that fits along the bottom and up the two long sides of the pan, leaving a small overhang on each side. This overhang acts as handles and makes it very easy to lift the finished loaf out of the pan cleanly. Set the pan aside while you make your batter.
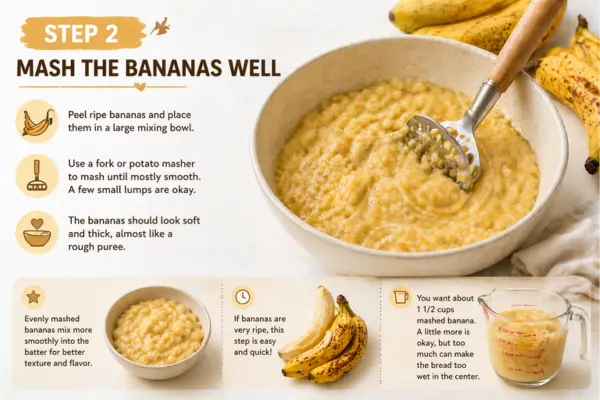
Step 2: Mash the Bananas Well
Peel your bananas and place them in a large mixing bowl. Use a fork to mash them thoroughly. You want to get them to a mostly smooth, creamy consistency — similar to thick applesauce. A few small lumps are perfectly fine and actually add a pleasant texture to the finished bread. The key here is using bananas that are truly overripe. The peel should be heavily spotted or even mostly brown. The browner the banana, the sweeter and more flavourful your bread will be. If your bananas are not quite ripe enough, you can place the unpeeled bananas on a baking sheet and bake them at 350°F for about 10 minutes until the skins turn black. Let them cool before peeling and mashing. Once your bananas are well mashed, move on to the next step.
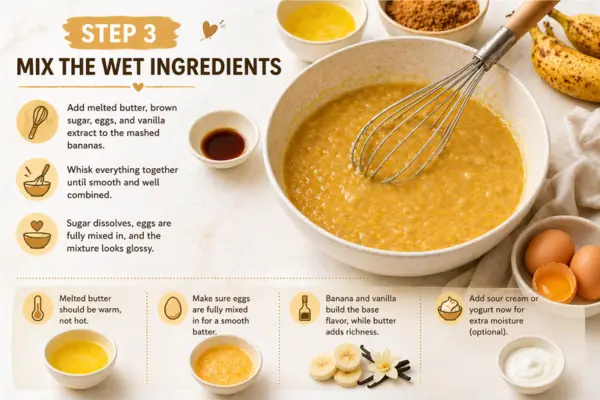
Step 3: Mix the Wet Ingredients
To the bowl of mashed bananas, add the melted butter. Stir it in well with a spatula or a large spoon. Make sure your butter is melted but not hot — if it is too hot, it can partially cook the eggs you add next. Once the butter and bananas are combined, add the sugar and stir until the mixture looks like a smooth, thick paste. Next, crack in the eggs one at a time, stirring well after each one. Add the vanilla extract and Greek yogurt and mix everything together until it is fully combined and smooth. The yogurt is not just a filler — it adds a significant amount of moisture to the loaf while also providing a slight tanginess that balances the sweetness of the bananas and chocolate beautifully.
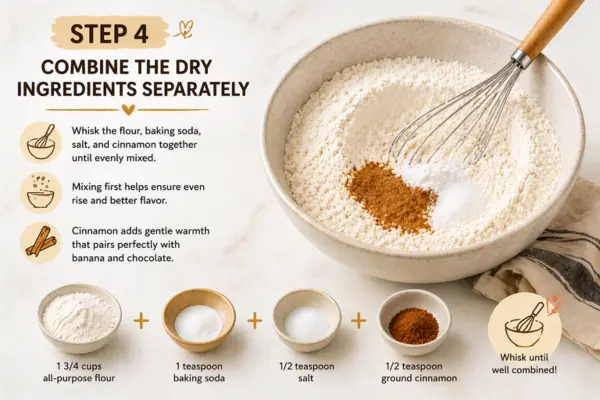
Step 4: Combine the Dry Ingredients Separately
In a separate medium-sized bowl, whisk together the all-purpose flour, baking soda, salt, and cinnamon if you are using it. Whisking the dry ingredients together before adding them to the wet mixture does two important things. First, it ensures the baking soda and salt are evenly distributed throughout the flour so there are no pockets of concentrated leavening in the finished loaf. Second, it aerates the flour slightly, which helps with the overall texture. Take care when measuring your flour. Do not scoop directly from the bag with your measuring cup — this packs the flour too tightly and you will end up using more than the recipe calls for. Instead, use a spoon to scoop flour into your measuring cup and then level the top off with the back of a knife. Better yet, use a kitchen scale if you have one.
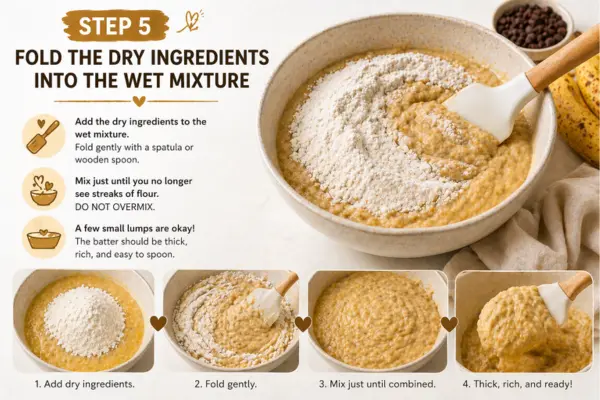
Step 5: Fold the Dry Ingredients into the Wet Mixture
Now it is time to bring the two bowls together. Pour the dry ingredient mixture into the bowl with the wet ingredients. Using a rubber spatula, gently fold everything together. Use slow, deliberate strokes — scoop from the bottom of the bowl and fold over the top, turning the bowl as you go. Stop mixing as soon as you no longer see streaks of dry flour. The batter does not need to be perfectly smooth. A few small lumps are completely fine. The most common mistake at this stage is overmixing. When you mix banana bread batter too aggressively or for too long, you develop the gluten in the flour, which makes the finished bread dense, rubbery, and tough instead of soft and tender. Mix gently and stop early.
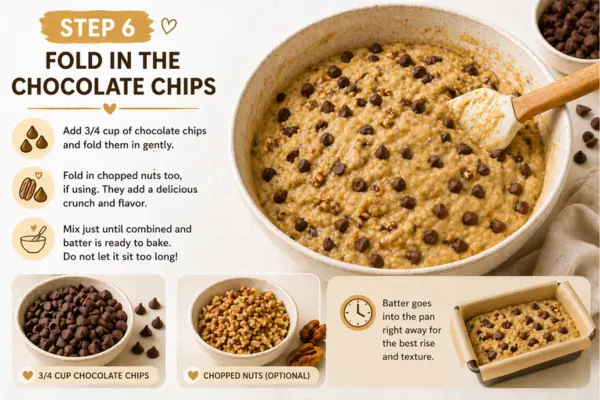
Step 6: Fold in the Chocolate Chips
Add most of your chocolate chips to the batter now, keeping about 2 tablespoons aside for the topping. Gently fold them in using the same slow, careful strokes you used in the previous step. Make sure the chocolate chips are evenly distributed throughout the batter so every slice gets a generous hit of chocolate. Semi-sweet chocolate chips work best in this recipe because they balance the natural sweetness of the ripe bananas without making the loaf overly sugary. If you prefer a richer, more intense chocolate flavour, feel free to use dark chocolate chips. Milk chocolate chips can work too, but they tend to make the bread quite sweet — keep that in mind depending on your preference.
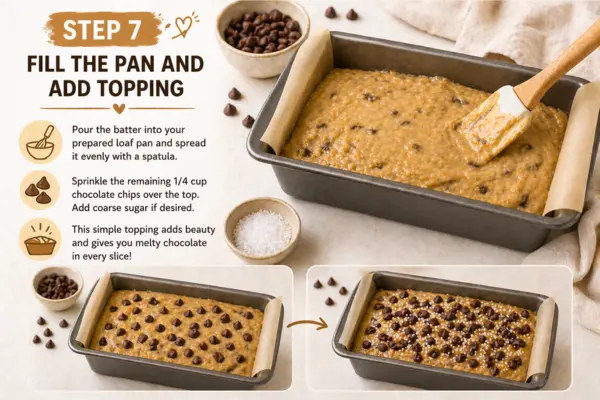
Step 7: Fill the Pan and Add Topping
Pour the finished batter into your prepared loaf pan and use your spatula to spread it out evenly so the surface is level. The batter will be thick — this is normal. Scatter the reserved chocolate chips across the top of the batter. This creates a beautiful, bakery-style finish and gives you those gorgeous melty chocolate pools on top of each slice once the loaf is baked. If you like, you can also sprinkle a small pinch of flaky sea salt over the top at this stage. It enhances the chocolate flavour and adds a lovely contrast to the sweetness of the bread. Set the pan on the middle rack of your preheated oven.
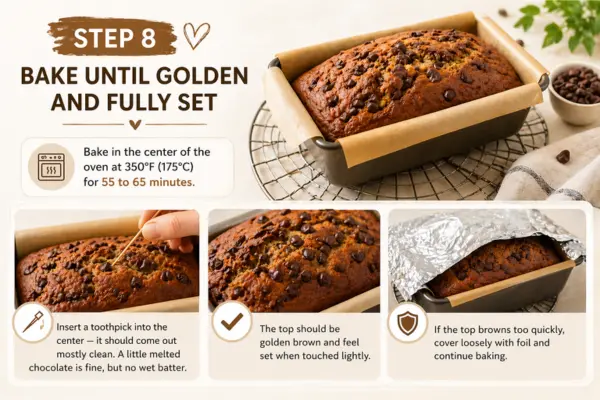
Step 8: Bake Until Golden and Fully Set
Bake the loaf at 325°F (165°C) for 55 to 65 minutes. Every oven is slightly different, so start checking at the 50-minute mark. The bread is ready when the top is deep golden brown and a toothpick or thin skewer inserted into the very centre of the loaf comes out with only a few moist crumbs clinging to it — but no wet batter. If the top of the loaf begins to brown too quickly before the centre is fully cooked, loosely place a piece of aluminium foil over the top and continue baking. This tents the loaf and prevents over-browning while the inside finishes cooking. Do not open the oven door too early in the baking process — this can cause the loaf to sink in the middle.
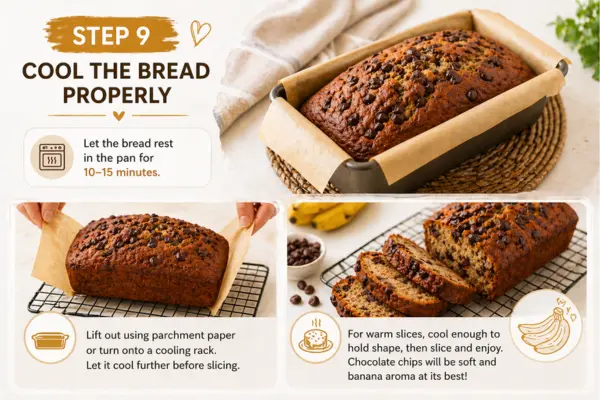
Step 9: Cool the Bread Properly
Once the loaf is out of the oven, resist the urge to cut into it straight away. Leave it in the pan and place the pan on a wire cooling rack for 10 to 15 minutes. After that, use the parchment paper overhang to gently lift the loaf out of the pan and set it directly on the wire rack to finish cooling. Allow it to cool for at least 30 minutes before slicing. Cutting hot banana bread is one of the most common mistakes people make — the inside is still setting as it cools, and slicing too early results in a gummy, collapsed texture. Patience here makes a real difference. Once cooled, slice with a sharp bread knife and serve. The bread will be soft, moist, and perfectly set.
How to Store Your Banana Bread
A well-baked loaf of chocolate chip banana bread keeps beautifully when stored correctly. At room temperature, wrap the loaf tightly in plastic wrap or place it in an airtight container. It will stay soft and moist for up to three days. Avoid storing it in the refrigerator unless your kitchen is particularly warm, as refrigeration can dry the bread out faster than room temperature storage. For longer storage, banana bread freezes very well. Wrap the whole loaf or individual slices in a layer of plastic wrap and then in foil, and freeze for up to three months. Thaw overnight at room temperature or warm individual slices in the toaster for a quick and satisfying snack. Slicing the loaf before freezing is a great habit — it means you can pull out exactly how many slices you need without defrosting the whole loaf at once.
Variations in the Recipe
Once you have mastered this base recipe, there are so many delicious directions you can take it. Here are some of the best variations to try.
Brown Butter Chocolate Chip Banana Bread
This is the upgrade that takes the recipe from great to extraordinary. Instead of simply melting your butter, cook it in a small saucepan over medium heat, stirring constantly, until it turns a light golden amber colour and smells nutty and toasty. This process takes about 5 to 7 minutes. Remove it from the heat immediately and allow it to cool before adding it to the batter. The brown butter adds a deep, rich, nutty layer of flavour that pairs beautifully with the banana and chocolate. It is a small extra step that makes a big impact.
Double Chocolate Banana Bread
For anyone who wants more chocolate flavour, this variation delivers. Add 3 tablespoons of unsweetened cocoa powder to your dry ingredients and use dark chocolate chips instead of semi-sweet. The cocoa gives the entire loaf a rich chocolate flavour all the way through, while the banana keeps it moist and naturally sweet. The result tastes like a cross between banana bread and a fudgy chocolate cake — and it is absolutely worth making.
Chocolate Chip Banana Bread Muffins
The same batter works perfectly as muffins, which are great for meal prep or lunchboxes. Line a standard 12-cup muffin tin with paper liners and fill each cup about three-quarters full. Sprinkle a few chocolate chips on top of each one. Bake at 350°F (175°C) for 18 to 24 minutes, checking with a toothpick at the 18-minute mark. Every oven is different so check early rather than late. Muffins bake faster than a full loaf, so keep a close eye on them.
Gluten-Free Version
If you or someone in your household avoids gluten, this recipe adapts well. Simply swap the all-purpose flour for a quality 1:1 gluten-free flour blend — the kind that already contains xanthan gum. The texture will be very similar to the original and the flavour stays just as good. Use the same measurements and follow all the same steps.
Banana Bread with Nuts
For added crunch and a more traditional flavour profile, fold in half a cup of roughly chopped walnuts or pecans along with the chocolate chips. The nuts add texture and a slightly earthy, buttery flavour that complements both the banana and the chocolate really well. Toast the nuts in a dry pan for three minutes before adding them to the batter to bring out their flavour even more.
Mistakes to Avoid
Even a simple recipe like this one has a few common pitfalls. Knowing what to avoid will save you time and guarantee a better result every time you bake.
Using Bananas That Are Not Ripe Enough
This is the single biggest mistake people make with banana bread. Yellow bananas — even the ones with small brown spots — are not ripe enough for this recipe. You need bananas that are heavily brown or almost completely black on the outside. At that stage, the starches inside have converted to sugar, which means your bread will be naturally sweeter and significantly more moist. If your bananas are not ripe enough, place them unpeeled on a baking tray and bake at 350°F for 10 minutes until the skins turn black. Let them cool, peel them, and they are ready to use.
Measuring Flour by Scooping
Scooping flour directly from the bag with your measuring cup is a very common habit, but it packs the flour in too tightly and you can end up using 20 to 30 percent more flour than the recipe calls for. That extra flour dries out the batter and results in a dense, heavy loaf that does not rise well. Always spoon the flour into the measuring cup and level it off with a straight edge, or weigh it on a scale. This one small change makes a noticeable difference.
Overmixing the Batter
Once the dry ingredients hit the wet ingredients, mix only until the flour disappears. If you keep stirring after that point, you develop the gluten in the flour and the bread becomes tough and chewy instead of soft and tender. Use a rubber spatula, not a whisk, and fold gently with slow strokes.
Slicing the Bread Too Early
It is tempting to cut into the loaf the moment it comes out of the oven — especially when it smells that good. But the inside of the bread continues to set as it cools. If you slice it while it is still hot, the crumb will be gummy and the slices will fall apart. Give it at least 30 minutes on the wire rack before you cut in.
Not Testing the Centre
Banana bread can look fully baked on the outside while the middle is still raw. Always use a toothpick or thin skewer to test the very centre of the loaf. If it comes out with wet batter on it, the bread needs more time. If it comes out clean or with just a few moist crumbs, it is done. Never rely on the colour of the top alone.
Opening the Oven Door Too Soon
Opening the oven during the first 40 minutes of baking causes a sudden drop in temperature. This can cause the loaf to sink in the middle and prevent it from rising properly. Set your timer and trust the process. Only open the door after the 40-minute mark to check the top and tent with foil if needed.
Conclusion
Chocolate chip banana bread is one of those recipes that never gets old. It is warm, comforting, easy to make, and always impressive — whether you are baking for your family, bringing something homemade to a gathering, or just treating yourself on a slow weekend morning. The steps are simple, the ingredients are affordable, and the result is a loaf you will be proud of every single time.
Start with the ripest bananas you can find, measure your flour carefully, fold gently, and let the loaf cool before slicing. Follow those four things and you will never have a bad batch. Once you have made this recipe once, you will find yourself keeping overripe bananas on purpose just to have an excuse to bake it again.
We hope this recipe becomes a staple in your kitchen. Head over to our homepage to discover more delicious food recipes, from everyday meals to weekend treats — there is something there for every taste and every occasion. Happy baking!
FAQs
Here are the most common questions people ask about this chocolate chip banana bread recipe, answered simply and clearly.
Can I use frozen bananas? Yes, absolutely. Frozen bananas actually work very well in banana bread because they become extra soft and release a lot of natural liquid as they thaw, which adds moisture to the batter. Thaw the bananas completely at room temperature, then drain any excess liquid before mashing and using them in the recipe.
Why did my banana bread turn out dense? The two most common reasons are too much flour or overmixing the batter. Make sure you are measuring flour correctly by spooning it into the cup and levelling it off — do not scoop from the bag. Also, fold the batter gently and stop as soon as the flour is incorporated.
Can I make this recipe without eggs? Yes. Replace each egg with a flax egg: mix 1 tablespoon of ground flaxseed with 3 tablespoons of water and let it sit for 5 minutes until it becomes gel-like. Use this in place of each egg. The texture will be slightly denser but still very good.
What type of chocolate chips work best? Semi-sweet chocolate chips are the best choice for this recipe because they balance the natural sweetness of the ripe bananas well. Dark chocolate chips give a richer, more intense flavour with less sweetness. Milk chocolate chips also work but can make the loaf quite sweet overall. The choice depends on your personal preference.
How do I know when the banana bread is fully baked? Insert a toothpick into the very centre of the loaf. If it comes out with wet batter, it needs more time. If it comes out clean or with just a few moist crumbs clinging to it, the bread is done. The top should be deep golden brown and the loaf should feel firm when you gently press the centre.
Can I add nuts to this recipe? Yes. Chopped walnuts or pecans are a fantastic addition. Fold in about half a cup along with the chocolate chips in Step 6. Toasting the nuts beforehand in a dry pan for two to three minutes enhances their flavour significantly.
My loaf is sinking in the middle — what went wrong? This usually happens for one of three reasons: the oven door was opened too early, the bread was underbaked, or too much leavening was used. Make sure you are using exactly 1 teaspoon of baking soda and not opening the oven before the 40-minute mark. Always test with a toothpick before removing the loaf from the oven.
Can I bake this in a different size pan? You can, but the baking time will change. In a smaller pan, the batter will be deeper and will take longer to bake through. In a larger pan, the loaf will be flatter and will bake faster. The 9×5-inch pan is the standard for this recipe and gives the best result. Always test with a toothpick rather than going strictly by time.

